Best tips on how to clean your ears with q tips, hydrogen peroxide, baby oil or candle. Your ears can become clogged when too much earwax (cerumen) accumulates inside them.
how to clean your ears
While it’s an important part of your body’s natural defense system for keeping dirt, bacteria and other things out of your ears, too much earwax can decrease your hearing ability.
Best Way to Clean Your Ears
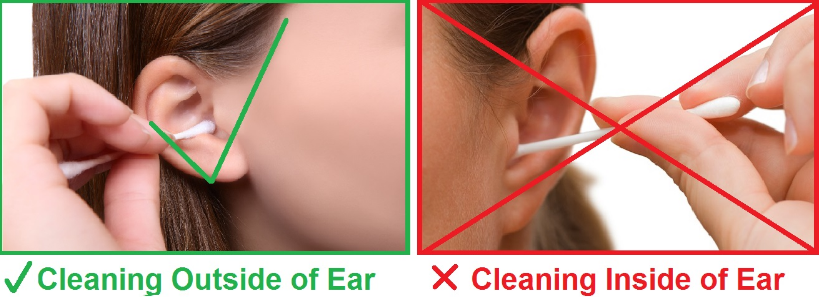
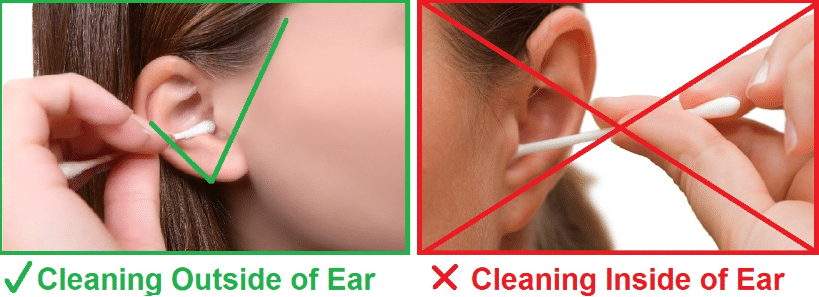
The ear is a delicate and intricate area, including the skin of the ear canal and the eardrum. Therefore, special care should be given to this part of the body. Start by discontinuing the use of cotton-tipped applicators and the habit of probing the ears.
The best ways on how to clean your ears is with water. As long as you have an intact eardrum, which most of us do, water helps to flush earwax. Some people may require the use of cerumen removal drops to flush earwax. Cerumen removal drops soften the wax so that when washing with water it flushes out easier .
Why does the body produce earwax?
Cerumen or earwax is healthy in normal amounts and serves as a self-cleaning agent with protective, lubricating, and antibacterial properties. The absence of earwax may result in dry, itchy ears.
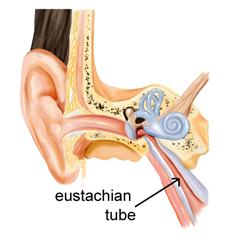
Most of the time the ear canals are self-cleaning; that is, there is a slow and orderly migration of earwax and skin cells from the eardrum to the ear opening. Old earwax is constantly being transported, assisted by chewing and jaw motion, from the ear canal to the ear opening where it usually dries, flakes, and falls out.
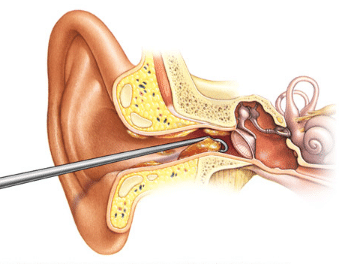
Earwax is not formed in the deep part of the ear canal near the eardrum, but in the outer one-third of the ear canal. So when a patient has wax blockage against the eardrum, it is often because he has been probing the ear with such things as cotton-tipped applicators, bobby pins, or twisted napkin corners.
These objects only push the wax in deeper.
How Often Should You Clean Your Ears?
If you produce a lot of ear wax (a common problem, one that is often genetic), consider cleaning your ears once a month, using hydrogen peroxide, mineral oil, or ear irrigation to get rid of excessive ear wax.
If you produce normal amounts of ear wax, or if you produce less ear wax than normal, you don’t need to clean your ears. Your ears will clean themselves.
At-Home Ear Irrigation
Remember that your ear is designed to be self-cleaning, meaning the shape and structure of your ear helps to drain away the wax. You can speed the cleaning process up by using a simple at-home ear flush.
However, there are several ways of how to clean your ears including the following;
- Make your own wax-softening solution. This offers a simple way of how to clean your ears, you can purchase a carbamide peroxide cleaning solution at your local pharmacy, or you can make your own. Combine warm water with one of the following
- A teaspoon or two of 3-4% hydrogen peroxide solution
- A teaspoon or two of mineral oil
- A teaspoon or two of glycerin
- Prepare an applicator (optional). You can simply pour the solution into your ear from the bowl if you don’t have an applicator on-hand. However, if you do have one around, it can make the process a little tidier and easier.
- Use a large plastic syringe with a plastic tip, a rubber bulb syringe, or even an eyedropper.
- Fill the applicator with the solution. Draw up enough so that the applicator is more than halfway full.
- Tilt your head to the side. The cleaning process will work better if your ear canal is as close to vertical as possible. Allow the ear you’re cleaning to face upward.
- Lie down on your side, if you can. Just be sure to put some towels under your head to catch any excess solution.
- Slowly put the solution into your ear. Pour the solution from the bowl into your ear, or position the end of the applicator a few inches above (not in) the ear canal and squeeze.
- If you used hydrogen peroxide, you may hear a fizzing or popping sound. Don’t worry, this is totally normal!
- If you can, you might want to ask another person to do this step for you. It’ll be easier for him or her to make sure the solution is actually getting into your ear.
- Allow the solution to work for a few minutes. Keep your head tilted to the side and give the solution some time to break up the earwax. Five to ten minutes should be sufficient.
- If you used hydrogen peroxide, allow the solution to work until you no longer hear fizzing or popping
- Drain the fluid. Hold an empty bowl under your ear, or put a cotton ball up to the outside of your ear. Tilt your head slowly, and allow the liquid to drain out.
Be careful that you don’t push the cotton swab into your ear — simply hold it lightly against the outside of the ear, so it’s positioned to catch the fluid
- Flush your ears. After the wax has softened, use a rubber bulb syringe to flush out loosened earwax. Gently squirt lukewarm water (at body temperature—98.6°F (37°C) into your ear canal. For very stubborn wax or for people with very small ear canals, an enema bottle filled with clean, warm water may work better than a bulb syringe.
Pull on the earlobe out and up to open up the ear canal.
Do this over the sink, tub, or other container: it’s a messy operation, and you may flush chunks of earwax out.
Can You Use Hydrogen Peroxide to Clean Your Ears
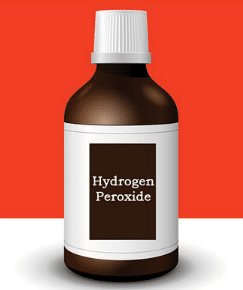
Hydrogen peroxide is best for cleaning ears
Hydrogen peroxide is one of the most common methods of how to clean your ears. It helps to soften and loosen the ear wax, making it easier for you to remove (with a cotton ball) or allowing the soft, now-liquid wax to simply drain out of your ear.
Using hydrogen peroxide can make it easier for your ear to clean itself (something that naturally happens with the movements of your jaw), so it may be worth using. Mixing it with warm mineral oil can do the trick nicely!
Ear wax protects your inner ear from dirt and other foreign matter. However, too much ear wax can affect your hearing and cause dizziness, pain or itching. For mild to moderate amounts of ear wax buildup, you can clean your ears with a hydrogen peroxide solution at home.
As hydrogen peroxide has a long history of use, it has become a safe and well-known method to ease discomfort associated with ear infections or unblock ear wax. You can easily learn how to use peroxide in ear for removing wax or eliminating an infection.
However, one thing you need to remember about hydrogen peroxide is that it can irritate your ear. If you use it more than once every day or two, the strong solution can cause itchy, red skin, which is prone to a greater build-up of wax (which is made to protect your skin from just such a problem).
If you’re going to use hydrogen peroxide, make sure to use it no more than once a day, and only for two or three days at a time. Any more, and you could cause irritation, dryness, and an increased risk of infection.
Glands within the ear canal produce ear wax and this wax is designed to trap small particles such as dust, which prevents them from reaching the eardrum where they could lead to an infection or damage. Most of the time, wax will dry up and fall out of your ear, taking trapped debris and dust with it.
In some cases, however, you may feel discomfort or as if you can’t hear as well. In this case, you can use these procedures to remove the earwax:
Step 1
Pull your hair back and cover your head with a towel or hat to prevent hair lightening or discoloring from the bleaching properties of peroxide. Alternatively, you can apply petroleum jelly to the hair strands around your ear.
Step 2
Lie down on your left side. You may use a pillow, but choose a flat or low loft pillow to keep your head level so your ear is parallel to the ceiling. This allows the hydrogen peroxide to penetrate deeper and prevents drainage from coming out of the ear.
Step 3
Using the cap as a measuring tool, pour 1 capful of hydrogen peroxide into your right ear. You should experience fizzing or popping sounds, and you may feel a deep itch inside of your ear. This is the hydrogen peroxide activating, breaking down wax buildup.
Step 4
Leave the hydrogen peroxide in your ear for 20 minutes. Stay in your resting position and allow the solution to work. The fizz and popping sounds may become less frequent or intense after a few minutes.
Step 5
Stand up and tilt your head to the right to drain the peroxide solution from your ear. Hold a bowl or towel under your ear as the solution drains. Small pieces of wax may also leave your ear.
Step 6
Dry the outside of your ear with a towel.
Step 7
Repeat the process on the left ear, resting on your right side. Cover the pillow with a towel to catch further fluid that may drain from the right ear.
How to Clean Your Ears With or without q Tips
ear irrigation
Using q tip
Earwax is one of those annoying facts of life, and for many of us, Q-tips are a satisfying way to get the gunk out. It offers a partial solution of how to clean your ears. But we’ve been on edge ever since seeing Hannah Horvath’s Q-tip incident on Girls (shudder), so we reached out to ear, nose, and throat doctors to find the best way to get that pesky earwax out, without any permanent damage
But we’re not exactly known for our willpower. So if you really, truly can’t cut it cold turkey, limit your cleaning to three times per month. To avoid any mishaps, only clean after a shower since the heat causes the wax to melt.
Line up a fingernail at the point where the cotton meets the Q-tip stick–this will be your safeguard to make sure you don’t go too deep. Gently wipe inside your ear, and try not to obsess over whether there’s any earwax left.
At the beginning, it is just a small quantity of ear wax around the ear canal. But the more you push the ear wax deeper into your ear, the more wax builds up. Eventually, you’ve pushed so much wax into your ear that you have a big glob deep in the ear canal, and you can block the canal completely – leading to reduced hearing.
Every time you push the wax deeper, you risk damaging your external ear canal. There is also a chance (albeit a small one) that you will rupture your eardrum, a very fragile membrane. If you’re using cotton swabs, only clean the outer third of your ear (where the ear wax is produced)
Without q tip
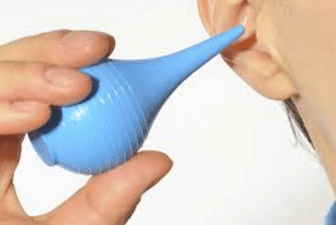
Q tip is not always the best advice of how to clean your ears. To avoid the scenario altogether, you are advised to ditch Q-tips and go for an oil and hydrogen peroxide routine instead. Once a week before bedtime, fill an eyedropper with olive, mineral, or baby oil. Put up to three drops inside each ear, and massage the triangle of cartilage that covers your ear to coat your ear canal.
Follow up with a cotton ball to keep the oil off your pillowcase. The next day when you’re in the shower, place hydrogen peroxide on your hand and rub it into your ear. The peroxide will bubble out, taking the softened wax with it and leaving you wax- and worry-free.
Most attempts to clean the ears by using cotton swabs or q-tips only result in pushing the wax further into the ear canal. Wax is not formed in the deep part of the ear canal near the eardrum, but only in the outer part of the canal near the external opening.
So when a doctor sees that a person has wax pushed up against the eardrum, he or she knows that it is often because the individual has been probing his or her ear with such things as Q-Tips, bobby pins or twisted napkin corners. Such objects only serve as ramrods to push the wax deeper into the ear and can lead to problems.
The skin of the ear canal and the eardrum is very thin and fragile, and is easily injured. The ear canal is more prone to infection after it has been stripped clean of the “good,” coating-type wax.
How to Clean Your Ears with Baby Oil
Although earwax is a natural substance that helps protect the ear and ear canal, sometimes it builds up, causing hearing difficulties or discomfort.
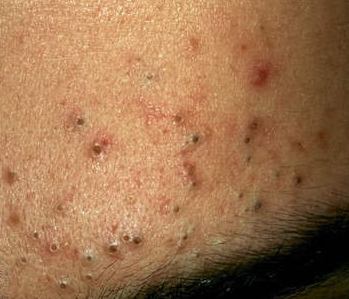
Earwax can be cleaned from the ear, but take care not to damage any of the sensitive parts of the ear while doing so. It’s advised by scientists to avoid Baby oil can cause pores to close and cause pimples.
If you have impacted wax, use a bulb syringe (like the ones used to clean out babies noses and mouths) filled with warm water. Put the tip of the syringe in your ear no further than the bowl (where the canal begins) and gently but with some pressure, start putting warm water in your ear.
Do this a couple of times, always using warm water as it loosens up the built-up wax, with a basin or towel pressed RIGHT at the base of your ear. If using a basin, you should notice some “flecks” of wax in the water.
Can You Use Candle to Clean Ears
Every person has earwax, which is also called cerumen. If you have a sense of fullness, discharge from your ear, or have difficulty hearing on occasion you may need to remove a buildup of wax.
There are many different ways of how to clean your ears, but ear candling, which is sometimes called ear coning, is one of the oldest and most widespread practices around the world to get rid of excess wax. Although there is some controversy about its efficacy, some alternative health practitioners believe ear candling is a safe and effective way to maintain ear and overall health. Follow the below steps in ear candling;
Be aware of the risks of ear candling. Alternative medicine practitioners are strong advocates for the benefits of ear candling, but many medical doctors believe that candling is ineffective and dangerous. Being aware of the risks and concerns about ear candling can help you make an informed decision if it is the best way for you to remove your ear wax.
- Studies by otolaryngologists (ear, nose and throat doctors) have shown that ear candling can cause burns, blockages in the ear canal, ear infections, and ear drum perforations even if you use the candle according to the packaging.
- Most medical doctors believe that ear candling is ineffective for removing wax
Have a friend or family member assist you. It can be difficult to perform ear candling by yourself. Have a friend or family member assist you during the process. This can help minimize the risk of burning yourself or causing other trauma to your ear
Size the tapered, or small, end of the candle to your ear. The candle should be fitted to the size and contours of your ear. This can help ensure the most safe and effective candling process.
Wash your hands and your ear. Before you begin candling your ear, wash your hands and wipe off your ear. This can minimize the risk of spreading bacteria that may cause an infection.
Cover your head with a damp towel. Moisten a large towel with some water and cover your head and upper torso area. This can help prevent a flame or any ashes from hitting you during the candling process.
Cover your head with a damp towel. Moisten a large towel with some water and cover your head and upper torso area. This can help prevent a flame or any ashes from hitting you during the candling process.
Sit upright for the candling process. It will be easier and safer for you to sit upright during the ear candling process. This can help ensure that falling ashes don’t contact or burn you.
Rub the area behind your ear. Before you begin the candling procedure, massage the area around and behind your ear. This can help relax you and stimulate circulation in your ear area.
Remember that you should be very careful when using candling as a method of how to clean your eyes.
What is Ear Wax – Meaning
This is a waxy material inside ear produced by sebaceous glands. Its main purpose is to protect, clean and lubricate the ear lining. It does so by trapping dust and repelling excessive moisture and water. Ear wax is slightly acidic hence an antibacterial agent that protects the ear against infections.
What Causes Ear Wax
Earwax is a water soluble mixture of several secretions, hair and dead skin. It is mainly formed in the outer ear and in a small section of the canal. It is however not found in deep part of the ear canal that extends to the eardrum.
It is made up of a combination of substances that include:
- Desquamated keratin squames: Includes dead flattened skin cells.
- Sebum: Oily substance produced by sebaceous glands.
- Cerumen: wax like substance which is produced by sweat glands.
- Other Substances include dirt and cosmetic materials.
Lack of earwax can lead to a sore, cracked, infected and waterlogged inside your ear. When in excess, this substance can also cause problems such as impacted ear, blocked and painful ear which can eventually lead to hearing loss.
Impacted Ear Wax Causes
This condition occurs when wax builds up in your ear canal mainly caused by external objects such as cotton swaps, ear plugs and hearing aids among others.
Ear canals naturally clean themselves, by slowly moving excessive wax from the eardrum towards the opening. Chewing and jaw movements are the processes that helps old wax to be migrated from the ear canal towards the ear opening where it dries, flake and eventually falls out.
It is a mistake to routinely remove earwax as a personal hygiene. Doing so using cotton-tipped buds, pins and other devices can lead to ear damaging which highly associate impacted ear wax, trauma and temporal deafness.
Ears should only be cleaned when the accumulated earwax prevents doctor’s assessment of your ears. Cerumen is the impaction of the ears and associates various symptoms that should be examined by a doctor. Removing wax yourself is dangerous. Both adults and children with this condition should be taken to a doctor.
Impacted Ear Wax Symptoms
There are various complications that can result from impacted earwax. This condition can result to an ear infection if not treated. Here are some of the complication:
- Infection of the external ear canal.
- Middle ear infection.
- A perforated eardrum
- Damaged external auditory meatus.
- Itching in the ear due to earwax touching eardrum.
- Earache and sensation feeling.
- Discharge and odor.
- Coughing and sneezing.
- Ringing in the ear.
- Partial hearing loss.
Impacted Ear Wax Removal
impacted ear wax removal
When you experience the above symptoms of an impacted ear wax, you should not panic, visit your pharmacist and explain. There are eardrops that can be used to soften and loosen the wax making it to fall out naturally.
Do not attempt to use cotton buds or bobby pins to remove the earwax. This can push it further into the ear making it more complicated. If symptoms persist, it is high time to go and visit your GP, who will examine the inside of your ears using an auriscope.
This instrument will help the GP to detect any build-up of earwax which will eventually be removed. Either eardrops may be used or a technique called ear irrigation, which involves using a pressurized flow of water to remove the impacted ear wax.
Black Ear Wax
The color of ear wax may vary from yellow, black or brown. In most cases black ear wax occurs when it has become older and has taken more time before removal. According to research, individuals can get black ear wax after using candles to remove excessive wax.
Ear infections can also lead to formation of black ear wax especially those that prevents the ear from cleaning itself. Working in a dusty and noisy environment, hearing aids and having more hair inside the ear are other causes of both impacted ear wax and black ear wax.
How to Clean Your Ears Wax
You can clean your impacted ear wax but it is recommended you seek medical advice from your doctor first. Here are the steps and procedures on how to clean ear wax. This method is not regarded as 100% safe for the health of your ear.
Requirements:
- Bath towel.
- Bulb syringe.
- Water (room temperature).
- Wax-softening liquid.
Steps and Procedures:
- Take your bath towel, fold it into half and place it on one side of a table. Sit on the chair at the table and turn your head side to rest gently on the towel as the affected ear is exposed on the upper side. This should be done with the help of somebody.
- Using an eyedropper, put 3 to 4 drops of the wax softening agent directly into the affected ear canal. Alternatively you can use oil-based cerumenolytic of olive oil, almond oil or mineral oil. Let the head to rest in position for 20 minutes to enhance softening of the impacted ear wax.
- With body temperature water, fill the bulb syringe to begin the irrigation treatment. Hot or cold water can harm the patient and causes side effects such as dizziness. Now sit the individual upright drop the bath towel on the shoulders and neck.
- Hold your syringe at a distance of ½ inch from the opening of the ear canal and gently spray water into the ear canal as you aim the water flow at the walls next to the impacted earwax. This strategic spraying helps in unclogging the ear and prevents pushing further the wax towards the inner ear.
- Slightly tilt the head towards the affected ear to enable the loosened wax and water softly drain from the ear. For effective impacted ear wax removal, repeat the ear irrigation treatment after 24 hours.
Tips and Warnings
This treatment is not ideal for individuals with a raptured eardrum, which is normally characterized by symptoms such as pain, discharge and buzzing. This also includes diabetic patients and individual with ear tubes. For such a case involve a doctor who will use special instruments in the removal of the wax.
Water based cerumenolytic may be used instead of an oil based solution. Among the recommended ones include plain water, hydrogen peroxide and saline solution. While using, use enough of the solution to fill the ear canal for proper dissolving of the impacted ear wax.
Do not use cotton swap, your finger or anything else to poke around inside your ear. Ear canal and eardrum are very delicate and can easily get damaged hence permanent deafness.
Kids mostly produce excessive ear wax although adults tend to have more wax problems. To ensure the health safety of ears, simply wipe outside of the ear with a wash cloth. The ear automatically gets clean while you keep the rest of the body clean.
If you suspect impacted ear wax in your ears or your kid’s, seek medical attention before trying on anything else which you are not sure of. Procedures above on how to clean your ears and excessive ear wax should be carried out after consultation with your doctor.